Total Pageviews

Wednesday 4 September 2013

Coastal Waterline Effect

I said I'd add a post on how I did the coastline for our recent gaming weekend so here it is. Since I'd made a mat for the desert terrain I was trying to think of a way to be able to overlay the water section on top of the terrain mat that would still give a decent effect. I'd seen the use of clear vinyl over coloured fabric on some other blogs but the terrain was always laid over the top of the vinyl and I was wanting the do the opposite. I figured it still should work but I'd need to be able to have the water effect blend with the coast line which seemed fairly simple since the terrain was already a sandy texture anyway, ideal for most coastlines, so the clear vinyl could just overlay that with little issue. The bigger challenge would be the deeper sections of the water represented with the darker blue fabric underneath and it would be too obvious to just have this end abruptly. I thought that what I could do was spray some lighter blue colour onto the ends of the darker fabric that would approach the coastline and gradually blend to a solid light blue colour and then have that graduate away so just the clear vinyl was left where the water effect met the coastline.

The fabric I used underneath was just simple inexpensive Navy Blue cotton fabric. I'd laid out the terrain as it would appear on the gaming days and placed the fabric over the water section. I cut it to match the coastline but made sure that it would sit further away from the coast area than what the vinyl would, allowing enough room for the blended section. I then did the same with the vinyl sheet cutting it so that it would end up where the final water position along the coastline would be. I'm not sure if this is the same with all clear vinyl but the piece I had had a smooth side and a rough side. I made sure the smooth side faced upwards for obvious reasons. 


Next step was to spray the fabric. The paint I used was Plasti-kote Gloss Super in Mediterranean Blue. 


Plasti-kote Gloss Super - Mediterranean Blue used for the light blue blending

My first attempt at spraying the cotton material did not go as planned. I found that the paint wasn't sticking to the fabric properly. Plan B was to brush watered down PVA glue in a broad section of the material where I wanted to blend the light blue. This would effectively take away any resistance to having the paint adhear. I had to wait until the next day to try again. The material obviously stiffened but not too much. I was still able to roll up the fabric for transport and storage. This time the spray went on very well. You can see in the close up photo where the the PVA section ends.


Light blue spray blended to the Navy fabric
Closer picture of the light blue blend on Navy fabric
For the vinyl I made sure I turned this over and sprayed on the rough side. I sprayed a strip along the coastline section attempting to let the colour feather out and give enough coverage to hide the fabric edge underneath.

Light Blue on underside of clear vinyl
Close up of light blue on underside of clear vinyl
When each section is laid over each other the effect is a blending of Navy blue to light blue to clear. The river section was done very similar by spraying the underside of a strip of clear vinyl cut to match the river gully that was created with the terrain boards underneath. The final effect as seen in my last post.


In an upcoming post I'll highlight the terrain board mechanism that I use underneath the mat that allows me to create nearly any battlefield design I like.

Sunday 18 August 2013

Making a Desert Terrain Mat

We recently ran our annual demonstration game at the Pine Rivers Model Train & Hobby Expo. The show is put on by the Members of the The Railway Modellers’ Club of Queensland Inc.

This year we were doing a Biblical era game using Field of Glory rules with 2000point armies.The armies were Hittite & Sea people Vs New Kingdom Egyptian all in 1/72 scale. As I wasn't supplying any figures for the show I offered to make up the terrain. In this case it would be a desert theme and I was keen to do a gaming mat as I'd need this anyway for wargaming the Sudan and WWII North Africa, so it certainly wouldn't go to waste. I thought I'd document the process I went through just in case others may be interested in trying this out, if not to the same scale as I did. The mat size I produced was 4.5m x 2.4m (14 3/4ft x 7 3/4ft). I did a bit of experimenting prior to starting the main project to check out different materials (sawdust, kitty litter alone) and paint colours to try and get it close before heading into the full scale project. What is listed below is the outcome of those trials.

Materials:
  • Calico Material - I had seen suggestions of using Canvas but Calico was cheaper, lighter and essentially would provide greater flexibility in being able to be shaped to the terrain required while still providing the necessary strength for such a mat.
  • Sand - I had two sources for this. Beach sand (from the beach), only a small container, and I purchased a 20kg bag of coarse sand from the local hardware. I then sifted the sand into 3 different sizes, Large, Medium and Small. The Large being similar in size the the Kitty Litter. I only used the Medium and Small. The idea I had was that the Kitty Litter would be lighter and therefore I'd use it in place of the Large sand. I'm not sure it made that much difference in the end.
  • Kitty Litter - Cheap supermarket brand, used for the large rock effect.
  • Caulking and caulking gun. I chose the cheapest I could find at the hardware store in the colour brown. Brown because if any of the large sand or litter can loose the dark brown colour would just look like a small hole in the ground. I did try a lighter colour in the trials but it didn't look as effective. This is the acrylic based filler that is used to fill the gaps in tile work and has to be paintable. It isn't silicone based. It's sometimes referred to mastic in other areas of the world.
  • Scraper - For spreading out the caulking.
  • PVA Glue - I mixed this in with the initial paint coat only and adding the grass tuffs on the final product.
  • Sample Paint Pots - Used Earthy tones. Darker to lighter as in the photo below. I actually bought two pots of the darker colour as it would be the most liberally applied. Each of these is approx 500ml. I used about 700ml of the darker colour mixed with PVA. The second about 400ml and less than half for the other two colours.
  • Paint Brushes. The larger one I used on the first two coats. The smaller one with the last two dry brush coats. This was a very cheap brush.
  • Rag - For patting down the sand into the caulking (see explanation later)
  • Grass Tuffs - I made these myself but any commercial ones will do - will just cost you a bit depending on the size of the matt and how many you want to use.
  • Other items I ended up using was some thumb tacks and 20mm PVC piping to attach the mat to so it could be rolled up.
Materials used in the making of the Gaming Mat
Process:
(Note: some of the photos may not be in strict order in respects to timing but may be placed to best represent the step in the process being discussed.) 
  • Applying the Caulking: Because I was making such a large mat I thought it would be important to ensure the material underneath didn't move too much while I applied the caulking. I had some particleboards that I use as my gaming tops and I thumb tacked the calico material to these boards as best I could to stop it moving around. Then using the spreader I spread the caulking evenly over the material
Applying the Caulking


Spreading the Caulking
  • Adding the Sand and Kitty Litter: At this point I applied the sand. Because the caulking isn't a real wet type of substance it was necessary to use a rag to pat the sand down into the caulking. I spread the large kitty litter first then each finer sand coarse finishing with the beach sand. The beach sand doesn't offer a lot of grain itself but puts enough of a barrier over the caulking so that it didn't stick to the rag as I was patting the sand down. Now there is probably a few questions that come to mind. 
    • Would it have been easier to just coat the whole material in paint without the caulking and then add the sand or maybe add the sand to the paint and either avoid the caulking altogether or just do the caulking in one hit and do the sand and paint after it dried? My reasoning for doing the approach I did was that I wanted a little more control over the sand application. I wanted to clump larger bits together and sort of give the effect that there would tend to be piles of larger stuff together rather than everything just being scattered evenly across the whole terrain. Trying to spread sand over large painted areas didn't appeal and I felt adding the sand to the paint beforehand would make the application too uniform. The caulk on the material is also important as it adds to the mats strength and painting alone would have likely been messy as I'm sure the paint would have seeped through the other side.
    • Isn't it possible to just texture the caulking without needing the sand? I tried this in my trial pieces and I couldn't get the effect I wanted. It also meant waiting for the caulking to dry a little otherwise it it had a tendency to sometimes detach from the material in large clumps with whatever was being used to texture it. In the end the sand gave the best result.
Spreading the sand
  • Work in Sections: The caulking will dry fairly quickly so it's important to work in small sections.
Patting down the sand to ensure it embeds into the caulking

  • Remove Excess Sand: I didn't want to risk dislodging large sections of sand so a gentle lifted and roll up the mat as I went allowing any loose sand to roll off as I rolled it up. I purposely didn't brush over the mat as I wanted to leave as much sand on it as possible for the initial paint coat.
Mat with excess sand removed
  • First Coat of Paint: The first coat of paint using the darker colour. I wanted to ensure that a good coat of paint was applied and would also provide some additional adhesion for the sand so I chose to add some PVA glue. I used a ratio of 2 parts paint, 1 part PVA, 1 part water. Since the mat was so large I thought it might be best to see if I could roller on the paint. Bad move! Since I had used Kitty Litter, which essentially is a liquid absorber, as I rolled the paint on they became soft and many started coming off the mat and sticking to the roller. This made in near impossible to actually get paint onto the mat. Below is 2 photos of how far I got with the roller before switching to the paint brush and the other shows the state of the roller when I stopped.
Extent of painting with a roller

Roller with bits of kitty litter stuck to it

First coat of paint completed (Wet Look)
First coat of paint dried
  • Second Coat of Paint: The second coat of paint was done less liberally. Not quite a dry brush but enough so that the darker colour still showed through in patches.
Starting the second coat of paint

Second coat of paint completed
  • Dry Brush the Yellow Tone: You would have noticed that one of the colours was a yellow tone. This was the third colour used and it was dry brushed all over the mat. The colour allows the mat to have a move vibrant tone. With the dry brushing there was the odd stone or two that came loose but a vast majority didn't so no need to panic if bits do come off. If you have the base colours right the section where the stone comes off will just blend in.
Yellow colour dry brushed on
  • Final Sand Colour Dry Brush: The last colour applied was the sand based colour. This really highlights all the texture in the mat. The close up image with the miniatures shows just how well it comes up.
Sand coloured dry brush

Complete painted look next to Italian Allies

  • Adding Grass Tuffs to Complete the Mat: The final step was to add grass tuffs to the mat. I wasn't too keen on doing this directly onto the mat as it would have meant a large clean up with any fibres that didn't stick. I chose to make the tuffs using various colours, but sticking to the more dried look rather than the spring grasses. If you can't make them then commercial ones would be fine. Even though I made up quite a few as you can see in the photo below, I actually didn't use that many. I made sure they were quite scattered so its feasible that you'd easily cover a smaller mat with less than 100 tuffs. I found that the straw coloured tuffs tended to get lost on the mat due to their light colour.
Final touches making grass tuffs

Grass Tuffs glued randomly over the entire mat

  • Finished Product: I was very happy with the final result and so were the other guys that I game with. The photos below are from the show weekend and you can see that it does mold to the terrain underneath quite well. I did find that there was some creasing where the hills were but it just added to the realism in my opinion and we did pin down some areas to get it to conform closer to what was underneath but the beauty of this being material based was that is was flexible enough to do that and the pins could be pushed through easily and didn't leave any noticeable holes when removed. More photos of the game day have been posted on TMP but I may post some more here on a later post.

Egyptian vs Hitite/Sea People Game of FOG

Game table view from the water side

Some final notes. I used 13 tubes of caulk to make the mat. I didn't weigh the mat but this is quite a large one and I'd imagine others wouldn't necessarily make ones this large. I estimate its really no heavier than 10kg (~22lbs) and for its size I think that is fairly good. Some gamers carry lead around heavier than that. I'd imagine someone's going to ask how the water was done in the above photo. I'll hopefully cover that in an upcoming post.

Post Note: I've had some questions about the flexibility of the mat and yes it is quite flexible. The terrain I use is with modular polystyrene blocks shaped so that I can make hills and valleys or river sections and then place a gaming mat over the top. The next two pictures will give a better idea of how flexible it is. The river section and coast line actually dips away and there are small hills on this layout. You can see in the first photo that the mat contours to the river section quite well. The last photo also shows the mat partially rolled up. It essentially has the flexibility of a heavy canvas mat.
Mat following the contour lines of terrain underneath

Matt partially rolled up to highlight flexibility

My Very First Post.....

Finally I've decided to put a post on my blog. Hard to believe but I actually created this blog in Sept 2011 and its only taken me close to two years to actually post something. Not bad I say!!

So a little bit about me might be good start.

My name is Daniel and I currently reside on the northern fringe of the Gold Coast in what is supposed to be sunny Queensland, Australia. You wouldn't think it was with the level of rain we've had over the last few years but at least all the dams a near capacity and noones talking about water restrictions. I'm married to a great woman who not only tolerates my hobby for the most part but also encourages it, and I have 5 children ranging from 3 years through to 15. My 15 yo is more interested in computer games than gaming but he will have the odd game with me. His preference is Warhammer 40K but what do you do???

I started collecting 1/72 scale figures back in the early 80s. I met an Scottish boy in primary school who had some Airfix Ancient Britons, Romans and ACW figures that I fascinated over every time I'd go over to his house. I sooo had to have them and eventually I bought them off him. They were missing bits here and there but I still have those figures. The first set I purchased at a store I think was the Airfix British Highlanders. They definitely were the first set I ever painted and while not the best, probably was fairly good for my age. My grandmother fueled my love of the hobby, purchasing numerous figure sets for me on Birthdays and Christmas and many times on not so special occasions as well. My brother's thing was matchbox cars. Mine, little plastic soldiers!

I collected Airfix and Esci figures into my late teens of any era, before other interests took over. I always had my original collection and did dabble in painting every now and then but it wasn't until after I met my wife back in the early 2000s I rekindled my interest in the hobby. The range had somewhat broadened over the years but my interest was mainly focused on ACW. I think a lot of John Wayne movies over the years got me hooked there. I had the intention not only on collecting plastics but also metals in the 1/72 - 20mm scale and then doing reviews and comparison shots for others interested in knowing how each brand compared with the others. It never eventuated, but I will probably still do it via this blog. I have managed to collect a lot of rare 20mm ACW figures over that time, some well out of production. I have well over 3000 ACW figures both metal and plastic. At the time I hadn't really made up my mind whether I was just going to do dioramas or try my hand at wargaming. I didn't know anyone who had the same interest in my area. Below is a picture I've mine that I've posted on TMP. For those interested I post under the tag Neilad (an anagram of Daniel)

Comparison of Thomas 20mm and Strelets 1/72 Abraham Lincoln

This focus on ACW led me to a gamer in Brisbane in 2010 by the name of Donald (Ochoin for those on the Hat or TMP forums), who was actually looking at what was available for ACW in this scale. We arranged to meet up and now, thanks to him, I am a strong wargaming advocate and have started collecting armies in many different eras......the main focus there being "collecting". Still working on the painting but will get there eventually. We game as often as we can ....generally once every couple of months but once a year we put on a two day event at a Model Railway Show in Brisbane. I'm generally the terrain guy which coincidentally I noticed matches my namesake on Larry Leadhead.

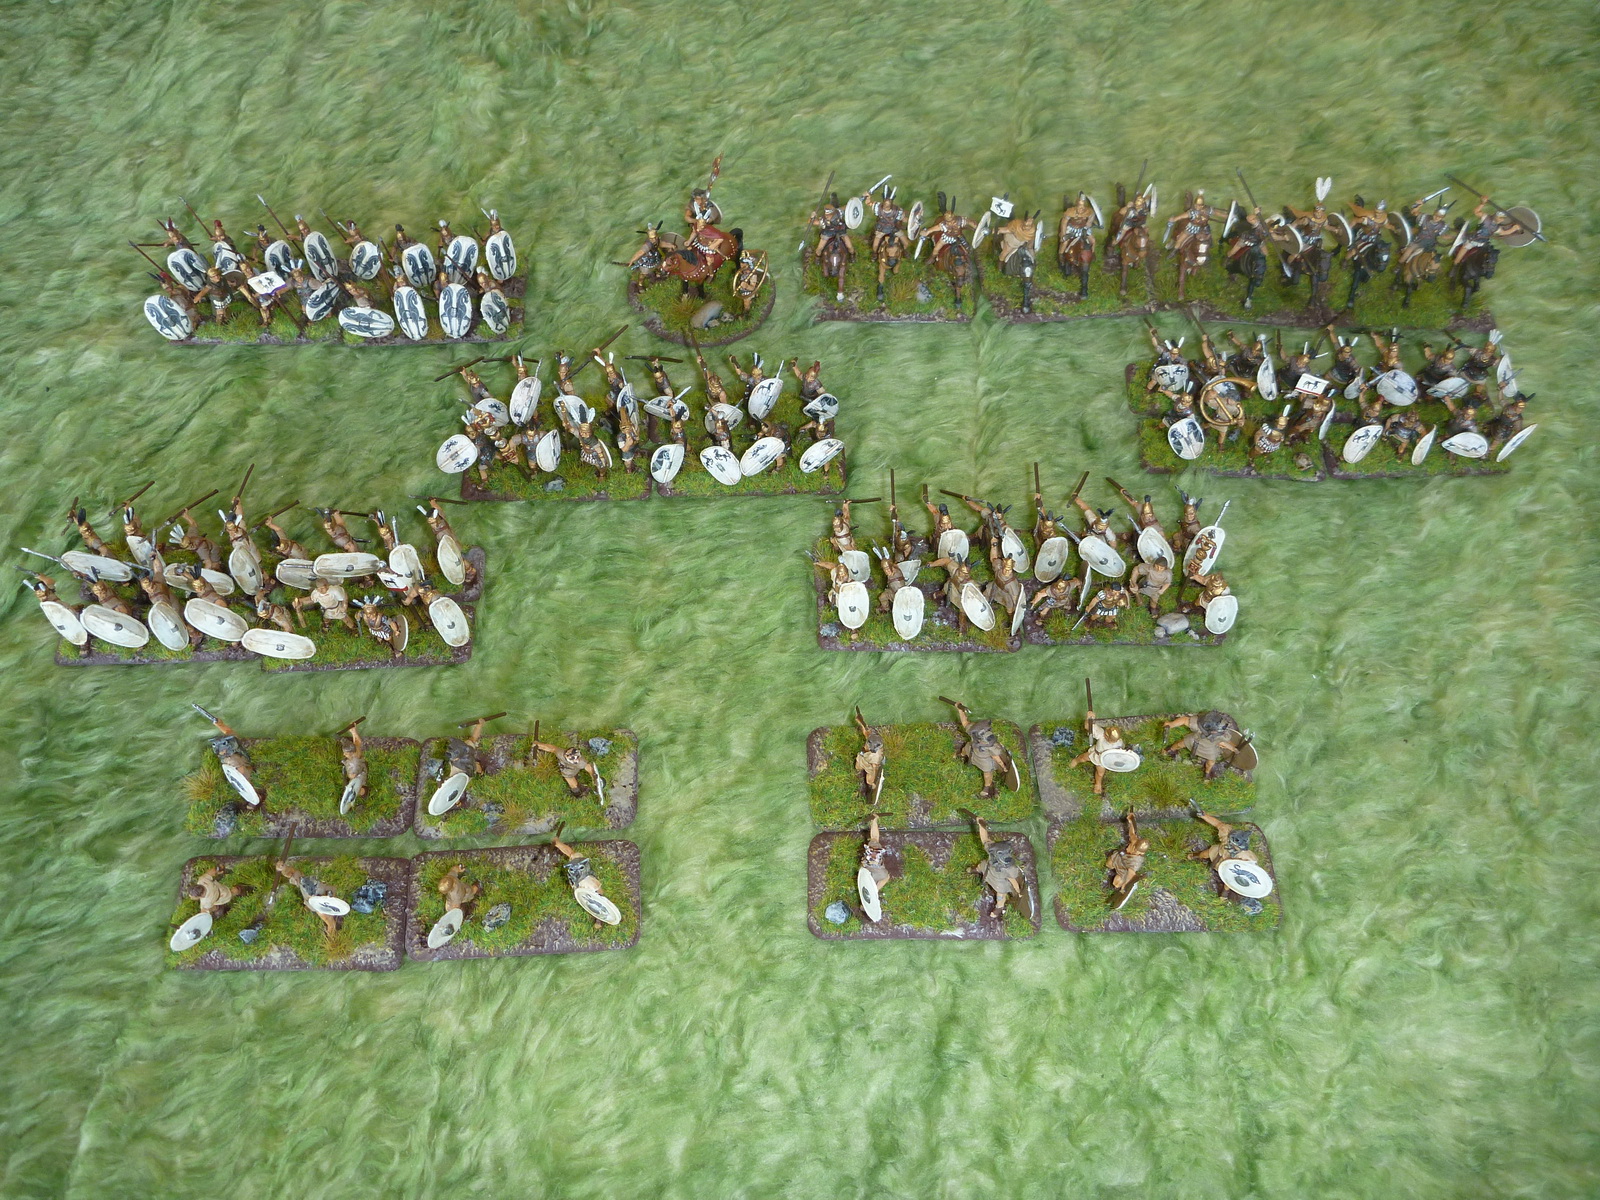
Below is the first unit I completed. An Allied Republican Roman force for Field of Glory ruleset, but more on that in a later post.

Allied Republican Romans
The Era's that I'm actively collecting armies for and intended rules are

Biblical - Assyrians - Field of Glory
Punic/Macedonian Wars - Roman/Gaul/Macedonian - Field of Glory
SYW - Hanoverian/British - Undecided (tried Pro Gloria but still looking)
Napoleonic Wars (only really a filler for the other guys armies) French - ELAN
ACW - Fire & Fury
Sudan - TSATF?? maybe something else
Zulu Wars - Undecided
WWII (North Africa) - German/Italian - Blitzkrieg Commander

Why 1/72? I think it is a great size for showing a lot of detail but small enough to field good size armies, and being mainly plastic figures, are cheap and relatively easy to convert.... and I love to convert. I've looked at smaller scales but the price point is still good at this scale.

The initial part of the this blog will be to go back through all my photos and post pictures of figures I've painted or terrain that I've put together over the last few years and hopefully add to this as I continue in this great hobby. I hope you will all enjoy.